
How to integrate with Productboard via OAuth2 - developer documentation
Important: This document is meant to describe how to enable OAuth2 authorization with Productboard. It isn’t supposed to serve as general learning resource for OAuth2 protocol. To learn more about OAuth2 itself, please consult another resources, such as oauth.co
Note: Looking for registering an OAuth2 application with us? Read the Registering an OAuth2 application section. Got questions? Reach out to us at [email protected].
Let’s imagine you are working on a product called AwesomeSheet, building next-gen online spreadsheets. You created a script, which makes use of Productboard’s public API to export features data from Productboard to your application. Now you want to enable your users to import their data from Productboard to AwesomeSheet by simply clicking a button. The problem is - how will the script get access to the Productboard data of your user?
One possibility would be to navigate the user to generate a Public API Access Token in the Productboard application and hand it over to you. This approach has several downsides:
- It’s a multi-step manual process prone to human error and possibly confusing to less technical users
- The access token is valid forever (unless explicitly revoked by the user). If malicious 3rd party would get hold of it, they could use it for long-term spying on your user’s data
- The access token would give the script unrestricted access to the whole Productboard API on behalf of the user. So the user would have to blindly trust that the script will use it only for its declared purpose (exporting features) and not let’s say for reading valuable insights from your user’s customers or deleting their data.
To address these issues we are providing you with the ability to allow your users to grant access to their Productboard workspaces to an external application in a safe, human-friendly, transparent, and restricted manner. We achieve this using OAuth2, which is an industry-standard protocol for authorization.
In the rest of this document, we will walk you through the process of enabling this kind of integration, starting with registering your application and ending with automated generation of access and refresh tokens.
Note: only Makers with admin access are able to authorize OAuth2 applications to access their workspaces.
OAuth2 authorization flow
Registering an OAuth2 application
You can register and manage your OAuth2 application at https://app.productboard.com/oauth2/applications. You need an active Productboard user account to access this page.
Getting the authorization code
Once you have the application registered you can trigger the authorization flow for the user. You do this by crafting a special URL your user will visit after clicking on a link/button you present to them. The URL base path will be app.productboard.com/oauth2/authorize and it will contain the following query parameters:
Parameter | Description | Example Value | Required |
|---|---|---|---|
client_id | Unique identifier of the application (received after registration) - random string | hqAGVdAy9FZX5Ky5cBHUB2F | Yes |
response_type | The value is always code to indicate the client expects authorization code in the response. | code | Yes |
redirect_uri | One of the registered redirect URIs (but URL-encoded). Must be an exact match. | https%3A%2F%2Fawesomesheet.com%2Foauth2-callback%3Ffoo%3Dbar | Yes |
state | An arbitrary string that will be sent back unchanged in the response. Useful as CSRF prevention and for encoding state (e.g. to redirect users back where they were before starting the authorization process) | 4agg4zF76rwd3bBM | No |
code_challenge | Base64-URL-encoded SHA256 hash of code_verifier generated by client. Required if you want to use the PKCE extension. | YTQxYjYxOTRjOTEwMWYwNDNjZmE1ZDkzZTQ5YzU3Mz | No |
code_challenge_method | The value is always S256, to indicate SHA256 hashing was used to generate the code_challenge. Required if you want to use the PKCE extension. | S256 | No |
The full URL embedded in a hyperlink can look like this:
<a href="https://app.productboard.com/oauth2/authorize?client_id=hqAGVdAy9FZX5Ky5cBHUB2FshBdSO6eN75tWMX46ZZd
&response_type=code
&redirect_uri=https%3A%2F%2Fawesomesheet.com%2Foauth2-callback%3Ffoo%3Dbar
&state=4agg4zF76rwd3bBM
&code_challenge=YTQxYjYxOTRjOTEwMWYwNDNjZmE1ZDkzZTQ5YzU3MzE1YWRkZDliNjM4NGRiYzMwNDgyN2U2ZDA4Y2RiOGVkZg
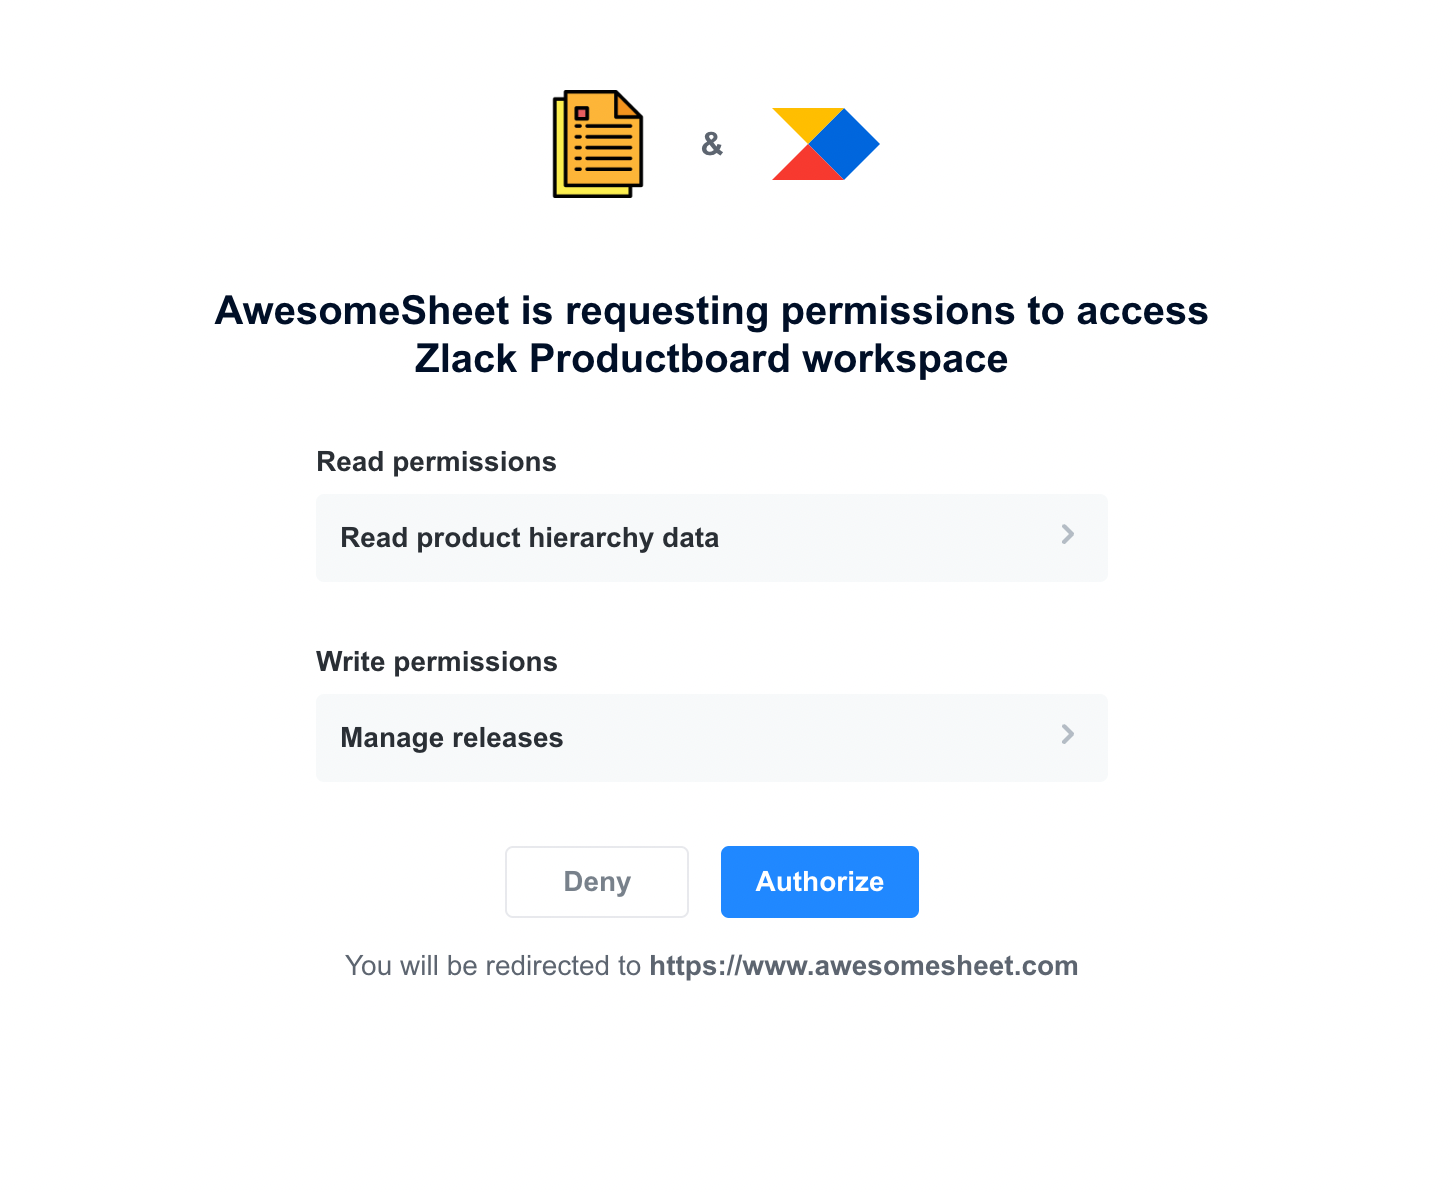
&code_challenge_method=S256" target="_blank">Import features from Productboard</a>After visiting the link, the user will have to select the Productboard workspace they want to authorize your application for and then (re)authenticate into Productboard. Then they will be presented with the authorization screen containing the information about your application, the permissions (scopes) it requires, and Deny and Authorize buttons:
Once they press Authorize (if they press Deny - see Appendix: Error handling) they will be redirected to the redirect URI you registered for your application along with two extra query parameters:
| Parameter | Description | Example Value |
|---|---|---|
| code | The generated authorization code | T-hTGrKxVMJg4kJOdbmS1i7GDlGgmD-GED2kRwBqQ37 |
| state | The same value as sent in the authorization request (if present) | 4agg4zF76rwd3bBM |
So in our example case, the user could be redirected to the following URL:
https://awesomesheet.com/oauth2-callback?foo=bar&code=T-hTGrKxVMJg4kJOdbmS1i7GDlGgmD-GED2kRwBqQ37&state=4agg4zF76rwd3bBM
Your integration should listen to that URL and grab the authorization code from the query parameters.
Retrieving the access token
From this point, you no longer need any manual action from the user and everything should be automatically handled by your integration. You can exchange the authorization code received in the previous step for an access token by making POST request to app.productboard.com/oauth2/token with the following query parameters:
| Parameter | Description | Example Value | Required |
|---|---|---|---|
| client_id | Unique identifier of the application (received after registration) - random string | hqAGVdAy9FZX5Ky5cBHUB2FshBdSO6eN75tWMX46ZZd | Yes |
| client_secret | Secret (password) for the application (received after registration) - random string | N2C--2ceRZ7W0alDjx5W10m5wPIg-4PGD7nwrpPjyMe | Yes |
| grant_type | The value is always authorization_code to indicate we are using Authorization code grant | authorization_code | Yes |
| redirect_uri | One of the registered redirect URIs (but URL-encoded). Must be an exact match. | https://awesomesheet.com/oauth2-callback?foo=barhttps%3A%2F%2Fawesomesheet.com%2Foauth2-callback%3Ffoo%3Dbar | Yes |
| code | Authorization code | T-hTGrKxVMJg4kJOdbmS1i7GDlGgmD-GED2kRwBqQ37 | Yes |
| code_verifier | String used to generate code_challenge in the authorization code request. Required if you want to use the PKCE extension. | zR.emfeaE.vwRTgN-fU67C6gyT.2zDm7VuolFURfo.PtnNBxfjvmu8yKJ1-CBY.elqm6cvorfLNvT27detiWGh-cP0EuE7lIxQFPLoFbZA2nXI9Ib1nyEe875UjEBXze | No |
Example request URL:
https://app.productboard.com/oauth2/token?client_id=hqAGVdAy9FZX5Ky5cBHUB2FshBdSO6eN75tWMX46ZZd
&client_secret=N2C--2ceRZ7W0alDjx5W10m5wPIg-4PGD7nwrpPjyMe
&grant_type=authorization_code
&code=T-hTGrKxVMJg4kJOdbmS1i7GDlGgmD-GED2kRwBqQ37
&redirect_uri=https://awesomesheet.com/oauth2-callback?foo=barhttps%3A%2F%2Fawesomesheet.com%2Foauth2-callback%3Ffoo%3Dbar
&code_verifier=zR.emfeaE.vwRTgN-fU67C6gyT.2zDm7VuolFURfo.PtnNBxfjvmu8yKJ1-CBY.elqm6cvorfLNvT27detiWGh-cP0EuE7lIxQFPLoFbZA2nXI9Ib1nyEe875UjEBXze
If everything goes well, you should get JSON object with the following fields as a response:
| Field | Description | Example Value |
|---|---|---|
| access_token | Access token in JWT format. Used for accessing Productboard public API. | eyJ0eXAiOiJKV1QiLCJraWQ… |
| token_type | The value is always Bearer - indicates the access token should be used as Bearer token in the Authorization header | Bearer |
| expires_in | Number of seconds the access token is valid for from this moment. | 86400 |
| refresh_token | Refresh token - random string. Used to get new access token once it expires. | 4w4_-gHaOVixNuS_naAvqsRTsCuV7wWQgn0jXQYtUhs |
| refresh_token_expires_in | Number of seconds the refresh token is valid for from this moment. | 15552000 |
| created_at | UNIX timestamp denoting when these tokens were created. | 1660051050 |
Example response:
{
   "access_token":"eyJ0eXAiOiJKV1QiLCJraWQiOiIwZjE5YzIyMjFhNmVlOWUwMDk3ZDliOTRkNzU4YWY0NGUyMDU1MDcxOTI2NTdhYzMzMDRhZjA2ZmIxY2MyMGNhIiwiYWxnIjoiUlM1MTIifQ.eyJpYXQiOjE2NjAwNTEwNTAsImlzcyI6ImU0NjljODdjLTI1NWQtNDMwYS05ZjcyLWFjODY5MzBjM2U5NSIsInN1YiI6IjI0ODM0NCIsInJvbGUiOiJhZG1pbiIsImF1ZCI6Imh0dHBzOi8vYXBpLnByb2R1Y3Rib2FyZC5pbmZvIiwidXNlcl9pZCI6MjQ4MzQ0LCJzcGFjZV9pZCI6IjQ2ODg2IiwiZXhwIjoxNjYwMTM3NDUxfQ.GsrpZb5ID6RtThijXed5RBolEByKxtURSmR4uSLaVeibcZpbzFZWBlN2zTFBkKFRqdYpfTlEr0GJrSc5jZOIp27yKIlvprEj2AW0FG9Zoj_N3V5Tv6f48oQ0x0q4PjAPiqQ2aE6swRYymMiufVqqFlpTlnypkUv7bVw1nDqsHG0zYb3Ha6kXHIGEhHR3RPVst1GspRZyqJo_Ml6N1S6dr5rDf6SxPmscopeEcJ1g9oKDjZTJ1A4wYHC33ZT7amE4VkedQcjAY2Gbslp7noAN9RTIW2vujU2eBJVFBye90dVZIxzoJbs5sGvzgOkUfT80Pbim1Zx-mVDBfLuThvZ5Dg",
   "token_type":"Bearer",
   "scope": "releases:read notes:create",
   "expires_in":86400,
   "refresh_token":"4w4_-gHaOVixNuS_naAvqsRTsCuV7wWQgn0jXQYtUhs",
   "refresh_token_expires_in":15552000
   "created_at":1660051050
}Important: The access token can then be used to access the Productboard API in the same way as the Public API access token generated inside Productboard.
Warning: You won’t be able to obtain the access or refresh token without another manual authorization by user if you lose them, so make sure you store them securely
Refreshing the access token
The access token is short-lived. Once it expires (you will get 401 - Unauthorized when making an API request), you need to refresh it using the refresh token you got in the previous step.
Warning: If your refresh token expires before you use it, the user will have to manually reauthorize the application.
The endpoint for refreshing the access token is app.productboard.com/oauth2/token and you need to provide the following query parameters:
| Parameter | Description | Example Value | Required |
|---|---|---|---|
| client_id | Unique identifier of the application (received after registration) - random string | hqAGVdAy9FZX5Ky5cBHUB2FshBdSO6eN75tWMX46ZZd | Yes |
| client_secret | Secret (password) for the application (received after registration) - random string | N2C--2ceRZ7W0alDjx5W10m5wPIg-4PGD7nwrpPjyMe | Yes |
| grant_type | The value is always refresh_token to indicate we are using refresh token grant | refresh_token | Yes |
| refresh_token | Refresh token | 4w4_-gHaOVixNuS_naAvqsRTsCuV7wWQgn0jXQYtUhs | Yes |
You should receive a response in the same format as when Retrieving the access token, but with fresh access and refresh tokens. The refresh token you just used will expire 60 minutes after you use it (buffer in case you experience network issues, so you can retry).
Retrieving token information
To retrieve information about an active access token and its user, you can use the /oauth2/token/info endpoint.
Request
GET <https://app.productboard.com/oauth2/token/info?access_token=><TOKEN>
Request parameters
| Parameter | Description | Required |
|---|---|---|
| access_token | An active access token | Yes |
Successful response
Response code 200
{
  "application": {
    "uid": "HhmcWDaB37dRzxn-8LbPWIYHttIgAUg5dFJude6OIu8"
  },
  "resource_owner": {
    "name": "Guybrush Threepwood",
    "email": "[email protected]"
  },
  "space": {
    "name": "Mêlée Island",
    "domain": "meleeisland"
  },
  "scopes": [
    "product_hierarchy_data:manage",
    "product_hierarchy_data:read",
    "releases:create",
    "releases:manage",
    "releases:read",
    "users:manage"
  ],
  "expires_in": 80746,
  "created_at": 1682056984
}
Revoking an access token
To revoke an access token you can use the /oauth2/revoke endpoint.
Request
POST <https://app.productboard.com/oauth2/revoke?client_id=><CLIENT_ID>&client_secret=<CLIENT_SECRET>&token=<TOKEN>
Request Parameters
| Parameter | Description | Required |
|---|---|---|
| client_id | Unique identifier of the application | Yes |
| client_secret | Secret (password) for the application | Yes |
| token | The active access token that will be revoked | Yes |
Successful Response
Response code 200
{}
OAuth2 applications management
Listing authorized applications for the workspace
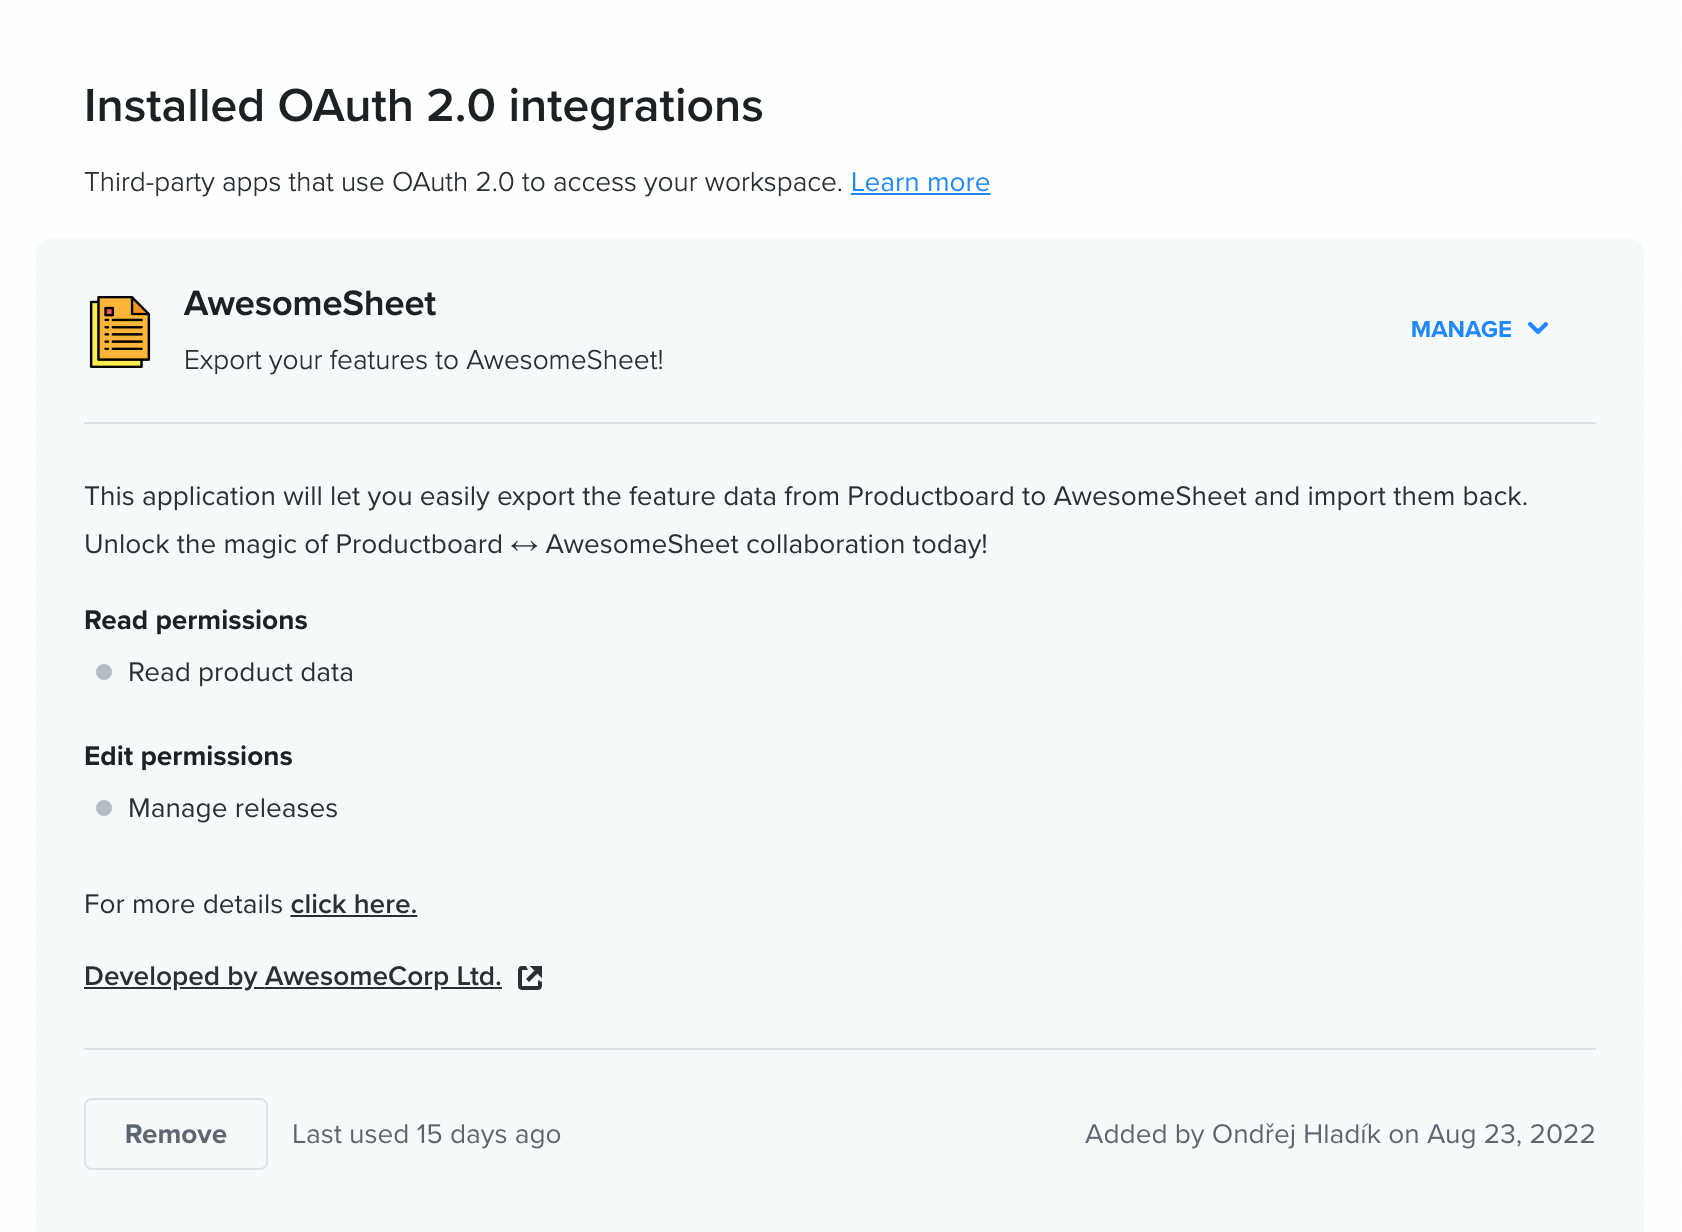
To view authorized applications for their workspace, users can go inside their Productboard and head to Settings > Integrations page, where they will find Installed OAuth 2.0 integrations section. Here they can find useful information about the authorized applications - what are they about, what kind of access do they have, who (and when) authorized them for the workspace and when were they last used. Note that the application will be displayed here only after the user clicks the Authorize button and after the application exchanges the received authorization code for the access token.
Revoking access to authorized application
In the section described above, maker with admin access can also revoke access to any authorized application listed there.
Deleting an OAuth2 application
The process of deleting an OAuth2 application for all the users is currently manual as well. Please fill in the deletion form and verify your ownership by sending us the Client ID and Client Secret you received after registration. After the request is approved, we will delete your application.
Appendix
Error handling
We follow the OAuth2 specification when it comes to error handling.
Errors during the initial authorization flow
The error code will be displayed to the user and if it makes sense it will be sent back to the application (to registered redirect URI) in error query parameter. List of the standard error codes is available here.
Errors during the token requests
For errors that happen during server-to-server communication (access/refresh token requests) the error details will be sent encoded as JSON response to the integration (in error field). List of the standard error codes is available here.
Access Scopes
To limit access of the application and to increase the trust of the users, we require each application developer to explicitly state which kind of permissions the application requires. We do this by leveraging the OAuth2 scopes mechanism. The required permissions (scopes) along with their descriptions will be displayed to the user on the authorization screen before they authorize the application.
We generally support 3 categories of scopes:
- Read scopes - allow to retrieve and list existing data and subscribe to webhooks.
- Create scopes - allow to create new data.
- Manage scopes - allow to update and delete existing data.
Below is the full list of the scopes supported at the moment:
| Scope | Description | Admin | Maker | Contributor |
|---|---|---|---|---|
| product_hierarchy_data:read | The application will be able to read all hierarchy entities (products, components, and features) and their attributes in your workspace. This includes the relationships between features, custom field values, releases, and Jira metadata. | ✅ | ❌ | ❌ |
| product_hierarchy_data:create | The application will be able to create all features and attributes in your workspace. This includes releases, roadmaps, and features. | ✅ | ❌ | ❌ |
| product_hierarchy_data:manage | The application will be able to edit and delete features and attributes in your workspace. This includes releases, roadmaps, and features. | ✅ | ❌ | ❌ |
| custom_fields:read | The application will be able to read hierarchy entity custom field definitions. | ✅ | ❌ | ❌ |
| releases:read | The application will be able to read releases and release groups. | ✅ | ❌ | ❌ |
| releases:create | The application will be able to create releases and release groups. | ✅ | ✅ | ❌ |
| releases:manage | The application will be able to edit and delete releases and release groups. | ✅ | ❌ | ❌ |
| notes:create | The application will be able to create notes. | ✅ | ✅ | ✅ |
| users:read | The application will be able to list users. | ✅ | ✅ | ✅ |
| users:manage | The application will be able to edit (note creating) users | ✅ | ✅ | ❌ |
| users_pii:read | The application will be able to read personally identifying information (names, email addresses, etc.) from (note-creating) users. | ✅ | ✅ | ✅ |
| members_pii:read | The application will be able to read personally identifying information (names, email addresses, etc.) from your Productboard users. | ✅ | ✅ | ✅ |
| plugin_integrations:manage | The application will be able to introduce and manage a UI plugin on your Productboard space. | ✅ | ❌ | ❌ |
| objectives:read | The application will be able to read objectives. | ✅ | ❌ | ❌ |
| objectives:create | The application will be able to create new objectives. | ✅ | ❌ | ❌ |
| objectives:manage | The application will be able to edit and delete objectives. | ✅ | ❌ | ❌ |
| key_results:read | The application will be able to read key results. | ✅ | ❌ | ❌ |
| key_results:create | The application will be able to create new key results. | ✅ | ❌ | ❌ |
| key_results:manage | The application will be able to edit and delete key results. | ✅ | ❌ | ❌ |
| initiatives:read | The application will be able to read initiatives. | ✅ | ❌ | ❌ |
| initiatives:create | The application will be able to create new initiatives. | ✅ | ❌ | ❌ |
| initiatives:manage | The application will be able to edit and delete initiatives. | ✅ | ❌ | ❌ |
| feedback_form_configurations:read | The application will be able to read feedback form configurations. | ✅ | ❌ | ❌ |
| feedback_forms:create | The application will be able to submit note via feedback forms. | ✅ | ✅ | ✅ |
Note: Some Productboard user roles are allowed to authorize only a subset of the OAuth2 scopes. For a Productboard user to be able to authorize an OAuth2 application, their role must be allowed to authorize all the scopes the application is requesting.
Example 1: If a Maker tries to authorize an OAuth2 application requesting notes:createand users:read scopes, it will work as the Maker role is allowed to authorize both scopes.
Example 2: If a Maker tries to authorize a different application requesting notes:create, users:read and releases:manage scopes, it will fail because the Maker role is not allowed to authorize the releases:manage scope.
Credentials Expirations
For security reasons, most of the credentials used within the OAuth2 authorization flow will expire after some time, and you need to refresh them. Below is the table listing all the credentials and their expiration times.
| Credential | Expiration | How to refresh it |
|---|---|---|
| Client Secret | Never | - |
| Authorization code | 10 minutes (or immediately after being used) | Manual reauthorization by user |
| Access token | 24 hours | Refresh token |
| Refresh token | 180 days (or 60 minutes after being used) | Refresh token / Manual reauthorization by user |
Feedback
If you have any questions or feedback regarding OAuth2 in Productboard, please reach us at [email protected].
Updated 8 months ago